Friday, December 19, 2014

lefreQue Sound Bridge


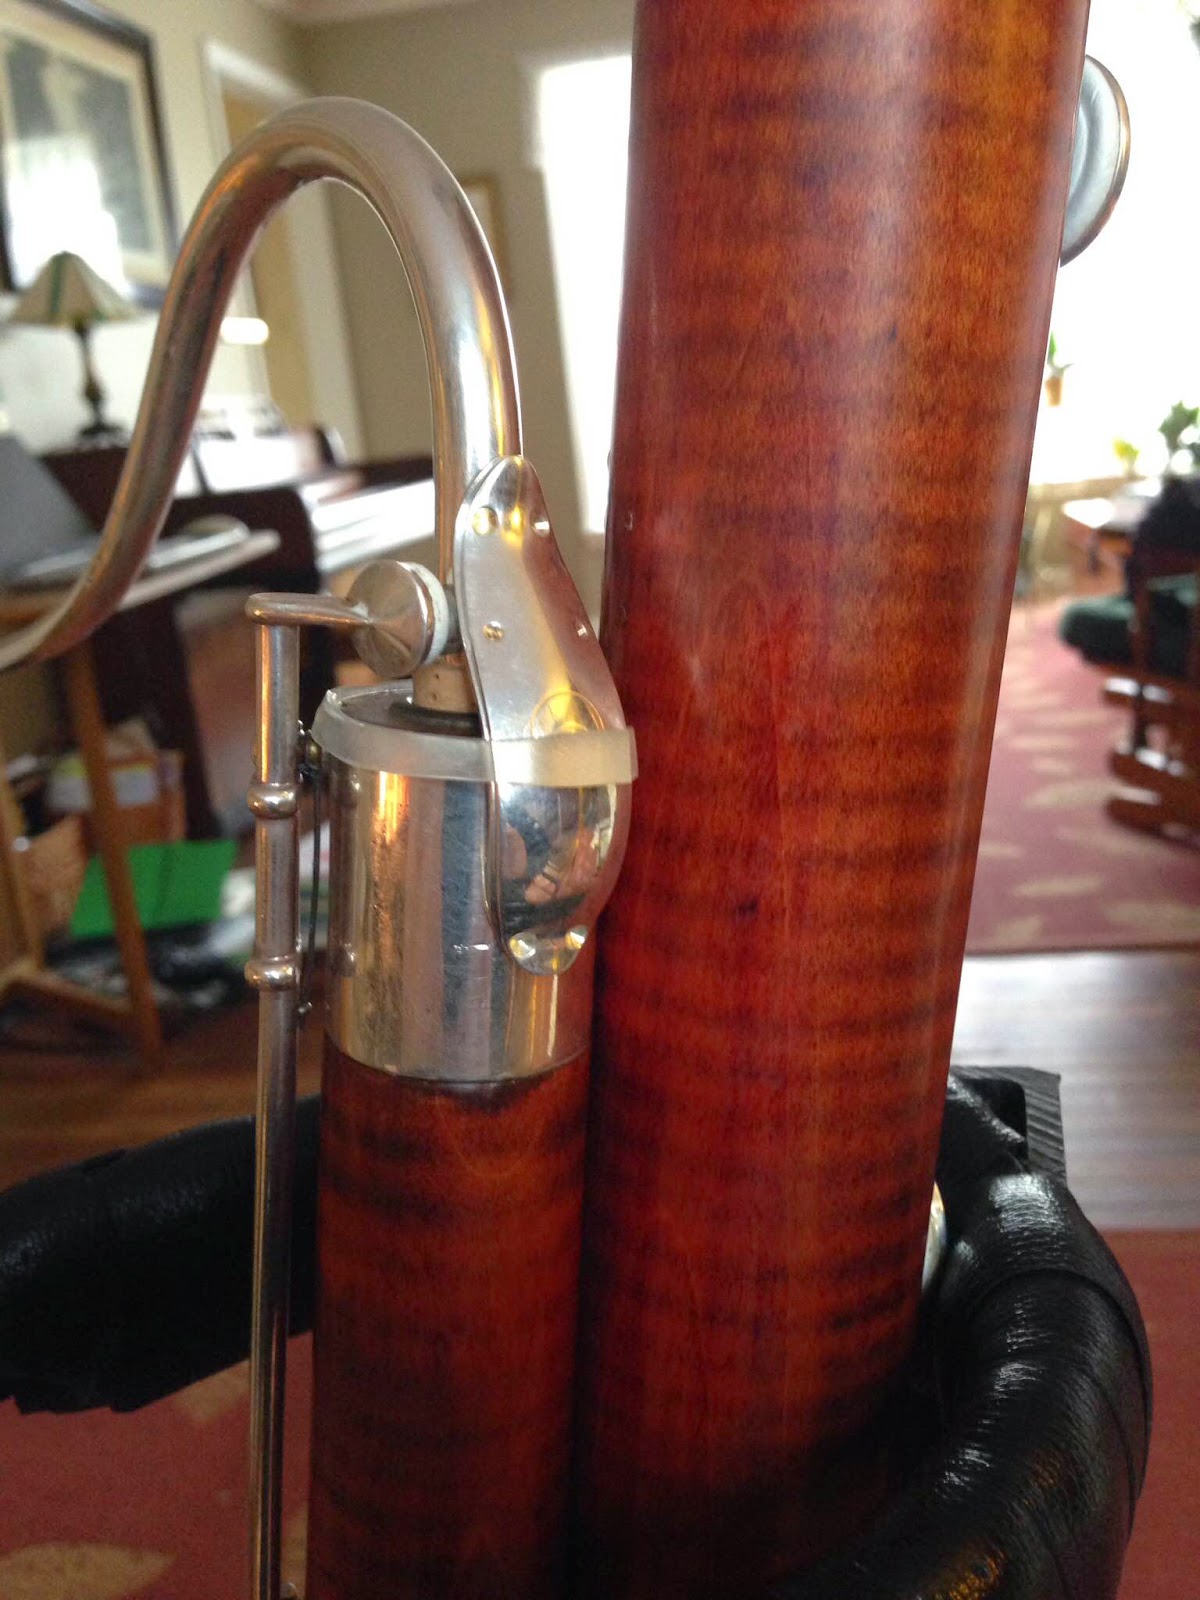
What's that metal baffle doing on my bocal and wing joint?


For hundreds of years, instrument manufacturers have broken the bassoon into several parts to make it more compact for carrying and to keep it out of harm's way. I've certainly never thought about what acoustical trade-offs occur when you cut up the body of the instrument into several parts.

However, it stands to reason that some resonance must be lost when an integral piece of wood is sectioned off. Especially when the sections are joined by tenons with cork or string wrapping. 

In the chart below (from Maarten Vonk's bassoon website), you can see the relative speed of vibration for various materials. Cork is on the slow end. Thus, it is often used to insulate or dampen vibrations in a room, for instance. Cork is a great material for maintaining a secure, tight seal between joints, but not the ideal substance for the resonance of a musical instrument. 

Air                      330 m/s
Glue less than       50 m/s
Cork less than      500 m/s
Solder (lead)        1260 m/s
Wood soft/ hard   1500 / 4000 m/s
Brass                  3600 m/s
Gold                    4700 m/s

The concept behind the lefreQue Sound Bridge is to link the resonance in the individual joints of the body of the instrument by placing a bridge between them.

The bridges are easy to install and take off. They are not permanent and do not require a repair technician to modify your instrument.

Research:

Before purchasing, I did some investigating with other bassoonists, repair technicians and by viewing various Internet sources.

There is a lefreQue YouTube channel but no bassoon demos at this point.

West Virginia University Bassoon Professor, Lynn Hileman has written an informative blog about her trial of the sound bridges.

Photos of them in use on bassoons show various methods of deployment.

Trials:

I have only tried the bocal/wing bridge (known as the Double Reed model) and the bridge for the long/bell juncture. I tried the various materials available, too -- sterling silver, solid silver, red brass, etc.

I tried them on my students' bassoons and we probed them in our bassoon section. 

The results were surprisingly variable. While my tests were by no means scientific, I noticed a wide variety in result (ranging from no audible difference to near life-changing difference). 

What I've come away with from months of testing is that every bassoonist needs to decide for him/herself if these bridges do anything at all, and if so, which ones, and how best to deploy them on your instrument.

Ways to Try:

Here are some ways I tried. My conclusions are based upon what worked for me, so try them yourself. In trying yourself, be sure to investigate all the different materials and ways to deploy them.  I've heard from other bassoonists who use these very differently from me and are quite satisfied!

1. Which bridges?

Some bassoonists are "fully lefreQued"! They use the bridges as a system. However, these little baffles are very expensive, so I would suggest trying one bridge at a time to see if a particular bridge is really adding anything at all.

My trials show that the only bridge that added any resonance for me was the Double Reed bridge -- or the one that bridges the wing joint and bocal. The only other one that had even a hint of added resonance was the long/bell bridge -- but not enough to justify a purchase.

2. Which material?

I tried the various materials (a lot like shopping for bocals!) and found the solid silver added the most resonance and gave the best sound.

3. How to deploy?

This may be the area that needs the most investigation. There seems to be no standard way to apply these, and for me, some of the most recommended ways didn't work very well.

The bridges seem to be very finicky if not assembled and positioned just right. Some people notice a fuzziness or buzzing coming from them at times. Like what you may experience from a sympathetic vibration coming from the body lock.

If you experience this buzzing, before rejecting a lefreQue for your bassoon, try re-positioning the bridge on the joint and make sure the two bridges are perfectly aligned one on top of the other with no overlap.

Overlapping bridges
Tension from the silicon band may cause the bridges to slip apart slightly when you put them on. Keeping one exactly on top of the other will decrease damping caused by metal touching metal (which may also cause some of the buzzing).

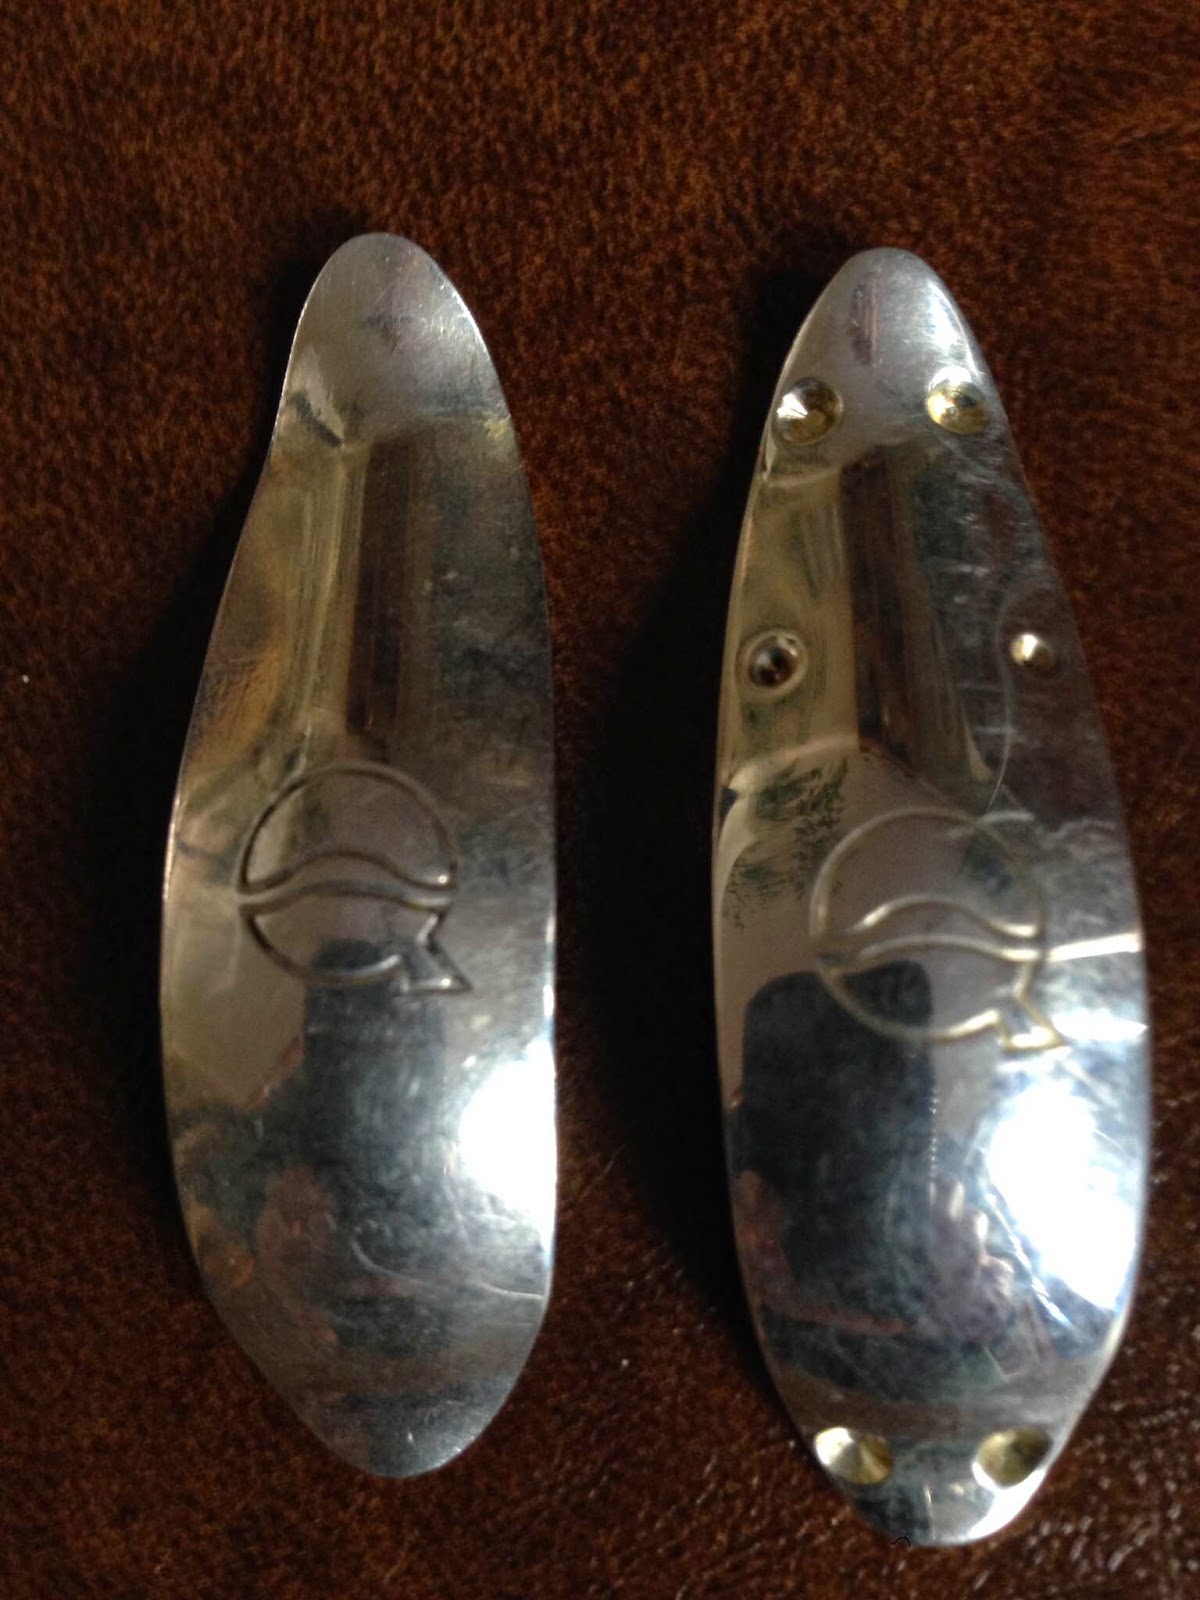
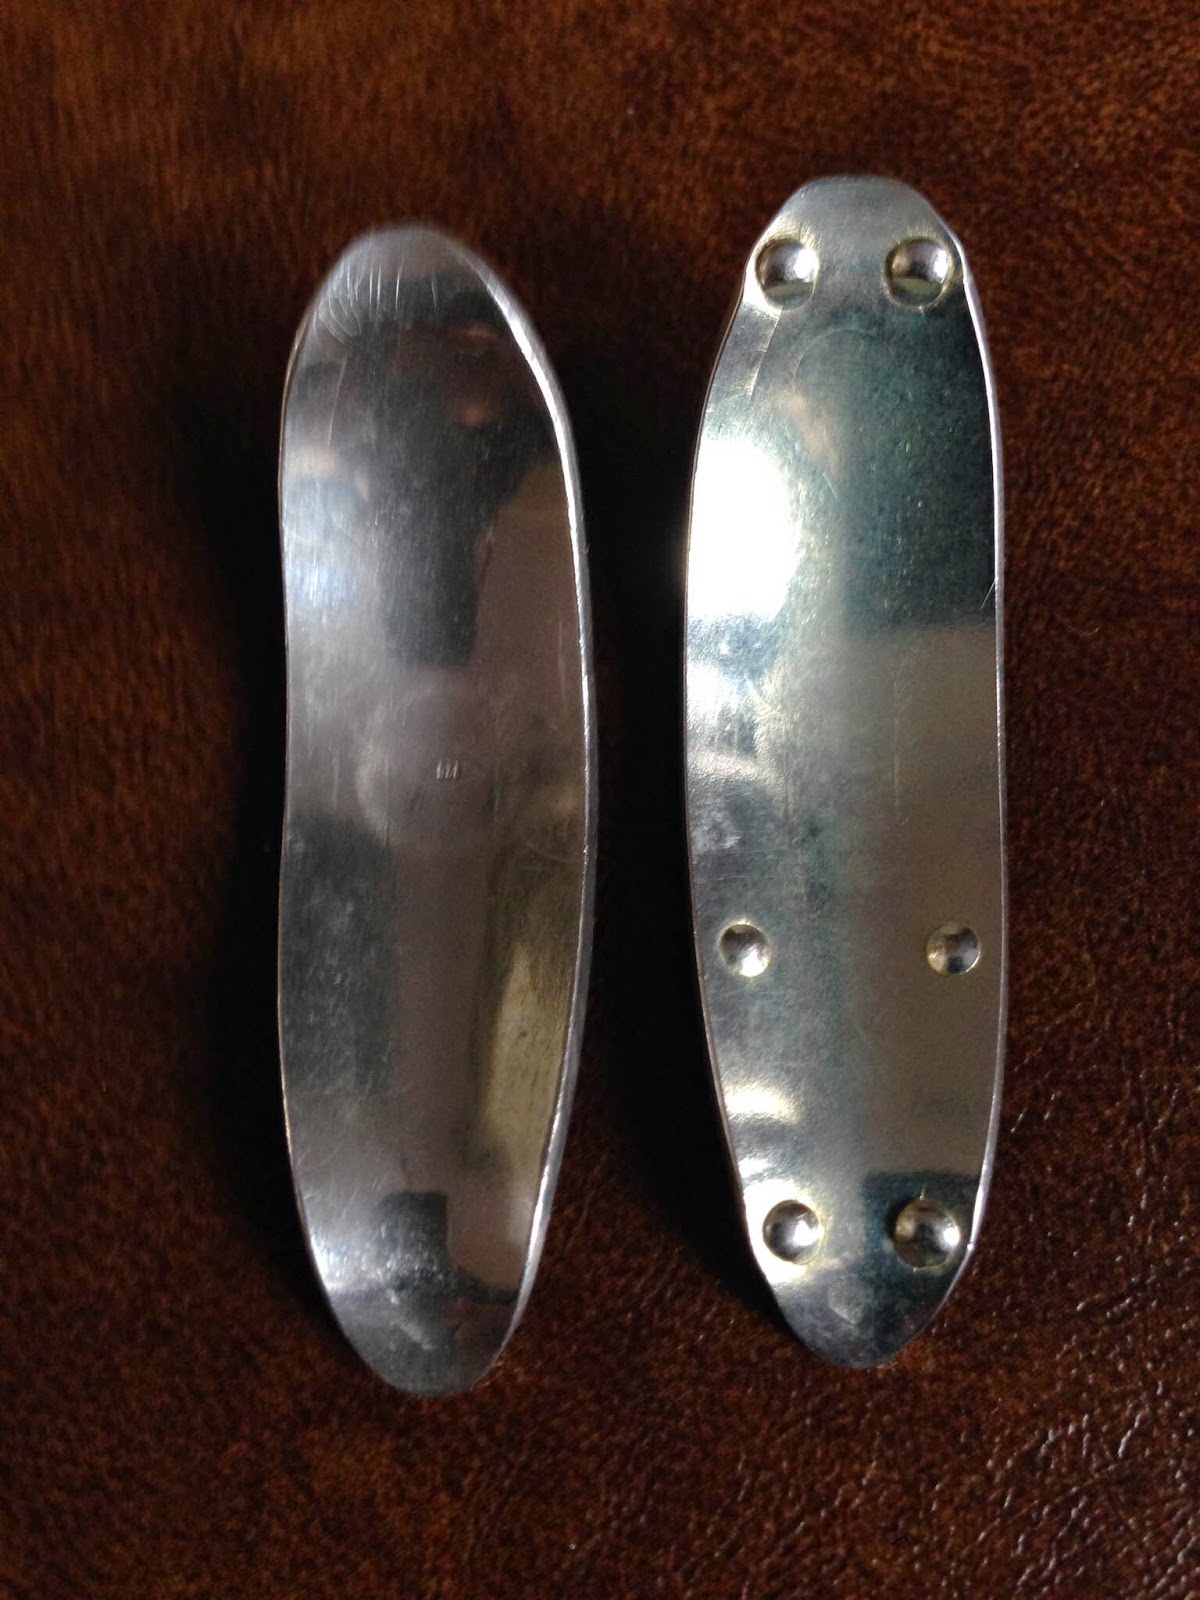
Each lefreQue comes with a set of two bridges. They should be used together, with the smooth bridge on the bottom and the "bumpy" one on top.

Top side
Underside
These two photos show the top and underside of the two bridges.

These bridges are not interchangeable. My trial with the bridge with the bumps placed on top of the smooth bridge produced more resonance than vice versa.

In the photos you can see how the two differ. The bridge on the left side is the bridge that contacts the body of the bassoon. It helps the body resonance jump from joint to joint.

The bridge on the right has little bumps that act as feet. This is the bridge that goes on top. The feet keep the bridge from completely contacting the bottom bridge and dampening its resonance. Originally, lefreQues were sold as single bridges. However, it was discovered that pairing each bridge with another one allowed for more resonance, as the lower bridge was not dampened by the fastening bands.

The tapers of the bridges are purposeful, with a more sharp taper at one end for each. This sharper taper is made to help the fit against the bocal, whereas the taper at the bottom better fits the circumference of the wing top band.
Taper
Fit against bocal and wing
 
How to attach?

Photos I viewed showed a few different ways of attaching the bridges. Here are the two most common ways:

Bound at feet
Bound at middle
You should try each way to see which produces the best result. I found a pretty big difference between the two, with the fitting the silicon band over the middle yielding the best resonance and sound.

I've thought a little about the use of silicon (also an insulator, not a very good material for carrying vibration). I wonder if a metal coil spring or something that also transmits vibration well might be a better agent for attaching these bridges?

The lefreQue company offers a few different kinds of bands. Indeed the package includes a veritable smorgasbord of bands. It's not clear there is one recommended way to attach as well!

How much tension?

Along with how to attach, I've wondered about the amount of tension placed on the bridges by the attaching bands. Too much could dampen the bridges' resonance, too little could add a buzzing sound.

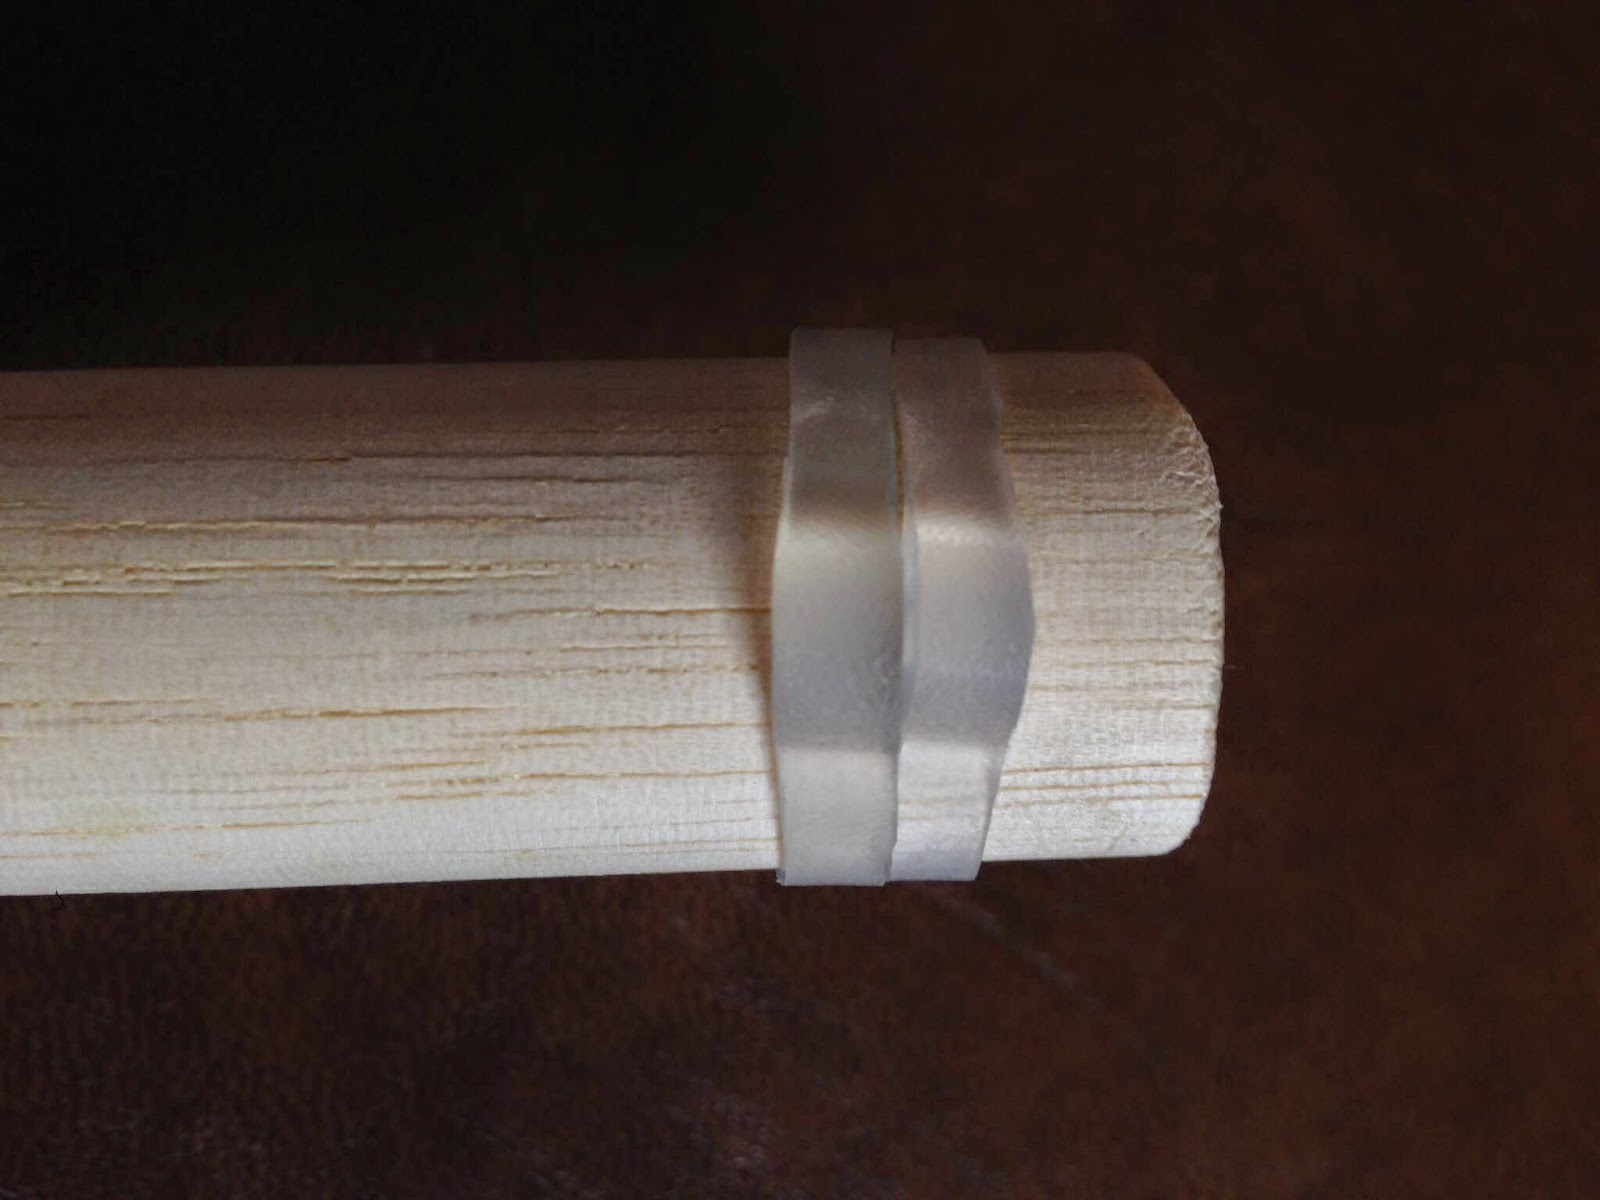
I found a good amount of tension by accident. I lost the original band sent with my bridges. Upon obtaining a new one, I noticed that it was wider and not as big in circumference as the old one. the fit was much more tight than the old one. An upgrade? 

After trying it, I thought the new band inhibited some of the resonance I was getting with the old one. To reduce the tension and, hopefully, free up some of the resonance, I cut the band's width in half. A more narrow band would be more elastic and free.


Original, cut

New width
This new width restored the resonance I was missing!

Where to position?

Another variable in deploying these things is exactly how to position them. Here again, different positioning yielded different results.

Here are the ways I tried with the bocal/wing bridges:

Under the post
By removing the whisper pad key, you can slip the band under the spring and mount it right up against the whisper key post. Putting the key back in place prevents the band from slipping out of position.

However, on my bassoon, this necessitated placing the band across the lower part of the bridge. This placed greater tension on the feet at the bottom of the bridges and very little on the top feet. There was a tendency for buzzing from the top and they were more prone to slipping out of place.

Moving the bridges down so the band could fit across the middle of them (near the trademark) caused the bottom bridge to contact the metal band at the top of the wing joint, resulting in a loss of resonance.

The best position for the band was fitting it around the very top of the wing joint metal band. It's best to put the band on before you insert the bocal. This makes it easier and safer to move or adjust the band if needed. The band is thin enough that it should fit between the wing and long joint without pushing the joints apart.

Best band position
Unfortunately, without the band locked in place under a key, it is necessary to keep an eye on the band so it doesn't slip out of place.

Where, exactly?

Front
Back
These photos show two possible locations for the bridges. Trying both, I found the front position to be the better of the two for sound and resonance. If you like this one, you must be careful to leave clearance space between the bridges and the swinging of the whisper pad key,so the whisper pad cup doesn't get caught up on the bridge!

The Bulge

One last thing I tried was putting the band on with the fat bulge over the bridges vs. rotating the band so the bulge is on the opposite side of the joint from the bridge. The sound was better with the bulge over the bridge. This is nice, because the bulge provides a nice, easy spot for your fingers to grab onto when removing the band. The bulge needs to be positioned exactly in the middle of the bridge's width for best resonance.


Bulge over bridge


Conclusions:

The lefreQue Sound Bridge provided a noticeable improvement in the resonance of my bassoon. It also helped some of the other instruments I tried it on, but not every bassoon showed improvement.

Attention to how the bridges are deployed, which ones are used, which material is best, how to attach them, tension of the band and where to place them on the body of the bassoon are important details you should explore when trying these bridges out.


Tuesday, December 16, 2014

A dime store solution!

 
In this post I'd like to describe an improvement I've made to my bassoon which costs next to nothing.

I made the modifications with help from Ken Potsic, my repair technician. I also sought advice from Frank Marcus and Shane Weiler.

My interest in investigating this was sparked by playing with our new Second Bassoonist, Gareth Thomas. Prior to his audition he substituted with us for two weeks. His two weeks were separated by a few months, during which he had some work done to his bassoon by Benson Bell.

Thus, I was able to get a good "before" and "after" impression of the improvement gained by his work with Benson. The difference was stunning. His sound had much more depth and resonance when he joined us for a week after Benson's work.

When asked, Gareth provided me with a detailed description of the issue with his bassoon and the solution.

In a nutshell, the problem had to do with misalignment of wing and long joint tenons in the boot joint sockets. The misalignment caused chokes in the flare of the bore at these junctures. These chokes cause unnecessary damping of the instrument's resonance.

Among other things, Benson Bell re-drilled the sockets and fitted new caps in them, properly aligning the joints so the bore at the end of each of the tenons is now flush with the bore at the base of each boot joint socket.

I learned that this misalignment is not uncommon in older Heckels and older bassoons in general. The smaller body size of the boot joint made a certain canting of the long joint bore necessary. Instead of running parallel to each other, the two bores of the boot joint in these older bassoons angle out a bit from bottom to top. You can observe this by noticing the way the wood tapers down in the body of the boot joint from top to bottom.

This was corrected in later Heckel series as the body of the boot joint was made bigger (wider). By looking at the body of a newer bassoon, you can see that there is less taper in the body of the wood and, thus, less angling to the two bores.

By itself, the angling is not a problem. The issue comes with the need to link the wing and long joint together for a good fit in the left hand. Instead of continuing the angle imparted by the boot joint, fitting them together requires the bores to be more or less parallel to each other.

Thus, in an older bassoon with a more slender boot joint, the angle has to change slightly at the juncture of the boot large side and long joint, .

If the large boot socket and long joint tenon are not mated carefully during manufacture, a misalignment can result.

How to check:

Because of the sizable improvement to Gareth's bassoon, I was curious to know if my instrument had some of the same issues, and if the bassoon be improved by addressing them.

The wing joint tenon has been replaced on my bassoon and mates precisely with its socket in the boot joint.

The long joint/boot intersection was another story.

To check my bassoon for this possible misalignment, I assembled wing and long joint in the boot (the wing needs to be in place because it may affect the positioning of the long joint in the boot bore). After removing the U-tube at the bottom of the boot joint I slid a wooden dowel rod through the bottom of the boot joint large bore towards the long joint.

I checked the bore at the four compass points by sliding the dowel through at those points. As the dowel passed through the junction of boot and long joint, I could feel the end of the dowel catch at one of the points.

If there is a catch, the dowel is hanging up on the end of the long joint tenon. The tenon end is protruding slightly into the bore, causing the choke. Sometimes this can be seen by looking through the assembled bassoon from the bottom of the boot joint, large side.

Often the protrusion occurs on the part of the tenon end facing away from the wing joint. This was the case with my bassoon.

While conferring with Frank Marcus, who had examined Gareth's bassoon, he suggested a simple method I could try on my own to see pursuing a modification like Gareth's would improve my bassoon.

Frank restored my bassoon back in 1997, so I have great respect for his work. However, the beautiful ivory that still adorns the bell of my instrument makes transport to and from Canada with the bassoon very risky. He suggested I send it without bell, but I wanted to have the bell with the bassoon to try before and after. Thus, he devised this solution to try on my own.

Frank's suggestion:

As the choke in my bassoon was caused by the long joint tenon end protruding over the lip in the boot socket at the side of the bore facing away from the wing joint (or closest to your thigh when playing), putting a few layers of tape on the outside of the opposite side of the tenon might put the tenon into better alignment. If the tenon fit in the socket wasn't too snug there would be room for the extra tape.The added thickness on one side of the tenon would move the tenon over slightly.

The trial:

I took the bassoon to Ken Potsic who put two layers of medical tape on that side of the tenon cap.


We found there was room for the tape. Tenons usually make contact with sockets at the cork or string wrap, so sometimes it's necessary to sand off a little cork or remove string to make this adjustment.

However, we were able to fit the joints together without any removal. I checked the bore with the dowel again and noticed no catching at the juncture this time.

I played the bassoon. Then we removed the tape; I played. I repeated with tape and without. We both noticed an improvement in the resonance of the bassoon and a smoother, more homogeneous scale with the tape in place.

Being naturally sceptical -- and since we were in a house basement (not a good acoustical environment) -- I replicated the before and after taping trial in Severance Hall.  I heard the same results.

Other factors:

I also measured the bore diameter at the end of the long joint tenon. The bore at this point is rarely perfectly round, so I measured the diameter at the widest and most narrow axes. (North/South, East/West) and averaged the measurements.

Then I measured the bore in the boot joint where it meets the long joint tenon (at the base of the socket).

I noticed that the bore was actually a bit larger in the boot joint than at the tenon end -- also a factor in the choke, since the bassoon bore is conical and the flare continues from boot to long joint. Perhaps at some point, I'll have the bore at the end of the tenon enlarged slightly.

Many bassoons have a metal reinforcing ring on the end of the tenons for protection. My bassoon has one on this end of the long joint. I measured the thickness of this ring (outside diameter minus inside diameter).

Then I measured the thickness of the wooden lip in the socket. Ideally the lip should be exactly as thick as the tenon end cap. The lip in my boot socket varies in thickness throughout its circumference. It is quite thin at the point where the choke occurs.

The lip is about .020" thinner than the tenon ring. So not only was there a misalignment at this point, there was also a difference in thickness of the two fitted parts.

Therefore, I placed some tape strips in the boot joint bore right where it meets the socket, effectively narrowing the bore and thickening the lip in the socket.


The addition of this tape removed some of the choke. A playing test revealed that this modification also added resonance to the instrument.

At this point, I'm not sure if I'm going to move forward with a more permanent modification to the bore. I like the "Dime Store" solution which Frank Marcus devised. While not a perfect fit, I'm sure, I'm certainly enjoying the increased resonance of a better fit at this juncture.

Perhaps in homage to two master repair technicians of the past who loved finding economical solutions to problems, I'll leave things alone.

I'm speaking of Lewis Hugh Cooper, who solved many problems with tape, matchsticks and paraffin wax and Hans Moennig, who did magical things to bassoons using dimes, sawdust and other things laying around his shop!


Thursday, December 11, 2014

Wilhelm Heckel Book


Wilhelm Heckel
Six Generations Dedicated to Music

I have just finished reading a wonderful book about the Heckel Company. Its author, Edith Reiter, is a member of the Heckel family and ran the company for many years. She has retired and now has written this history of the firm and family.

The history covers the span of the company from the historic joint effort by Johann Adam Heckel and Carl Almenräder in developing the modern-day bassoon in the early 19th century right up to 2013.

The book will appeal to bassoonists in particular, of course. However, many readers will learn -- as I did -- that Heckel made all the woodwind instruments and many brass instruments until World War II, supplying orchestras and bands in Germany and around the world.

The book is lavishly illustrated with many historic photos and reproductions of documents. We can see the receipt for purchase of a Heckel bassoon by Julius Weissenborn. The collaboration with Paul Hindemith in composition of music for the Heckelphone is documented in text and with a photo of his visit to the workshop in Biebrich.

In the back of the book are lists of all the instruments sold by Heckel for which they have records. Each instrument is listed with a serial number (if applicable), date of delivery and country of delivery (if known).

If you own a Heckel bassoon -- especially if you are not the first owner -- this listing may shed some light on your instrument's history.

It is fascinating to chart the rise and drop in production of Heckel bassoons over time. No German firm was exempt from the vagaries of two World Wars, hyperinflation and economic depression during the 20th Century.

The World Wars hit the Heckel family personally. August Heckel died in battle in September of 1914, an early casualty of World War I. Edith Reiter documents the shell shock her sister Gisela suffered during bombing in World War II. Indeed, the factory was damaged during that time.

By scanning the serial numbers and dates you can see production rise as Germany rose out of the hyperinflation of the early 1920's (I have a 1 million Mark note from that time, sent to ancestors in the U.S. by German relatives). Orders from the United States really picked up during this time. Dozens of 7000 series Heckels were delivered to the United States in the summer of 1930 alone (including the bassoon I play!).

As World War II approaches you can see the effect of the Molotov-Ribbentrop Pact as orders from the Soviet Union pick up during that brief time. The orders drop precipitously after the German invasion in 1941.

After the war, American orders pick up again. Edith Reiter credits many American supporters and customers with helping the firm get back on its feet during this time.

She graciously shares many personal stories about herself and her relatives that make the history of the company come alive. As the only woman apprentice in the factory during the 1950s, she was viewed with suspicion (the boss's daughter!) by some of the workers. Her father ordered all nude photographs removed from the shop floor. I guess machine shops are the same everywhere!

The book is in a side-by-side bilingual format -- German and English. English readers not comfortable with German can read straight through by just skipping over the pages in German.

The English translation is good, but not perfect. Some technical terms are mistranslated. When referring to keypads, the German word, "das Polster" is translated as "pillow" -- a funny image of little pillows under the keycups on a bassoon appears in your mind.

As with many German nouns, the word "das Rohr" can be translated variously. It can refer to anything resembling a pipe or anything that has a bore. It would have been helpful if the translator had been more careful in checking when the word "reed" is intended instead of "bore" or even "bocal".

Perhaps in a successive printing, these minor issues can be addressed.

I'm sure many music dealers who cater to double reed players sell this book. I purchased my copy from TrevCo-Varner Music

Tuesday, December 9, 2014

New Shaper

The Fox Products Corporation has copied another shape for me. It is called the Fox Straight Shaper ST2.

This is a copy of my favorite foldover shaper which is a Berdon #6--no longer made. Having it available from Fox in the straight shaper format is terrific! A straight shaper is more accurate, consistent from piece to piece, easier to use, safer and faster than a foldover.

The copy turned out really well. There is virtually no difference I can see between a piece shaped on my old Berdon and the new Fox.

At this point, the new shaper is not listed on the Fox Products website. To order within the U.S. call (260) 723-4888 and ask for Angie Strayer. Email is angelia.strayer@foxproducts.com

The shaper retails for $189.00.

Those of you who make reeds following the instructions on my website or use this blog will want to have this shape. It allows for a reed that does many things well.

Tuesday, November 4, 2014

How I Clean Up

Image result for broom

It's Fall and time for cleaning up around here.

Accordingly, I've been thinking about how to clean up bassoon articulation.

In my last post, I raised the issue of cracking articulation, especially as pertains to page 2 of Bolero. In the previous post, I offered a fingering for high G that may clear up dirty articulation. Now I'll offer a way of articulating that works for any note or situation in which it's easy to crack.

First of all, if you don't have this problem, don't read further, unless you're just curious to learn a way to teach clean articulation. If it ain't broke, don't fix it!!

For anyone who's struggled with articulating clearly on the Bolero passage, the first note of the Bolero solo, Rite of Spring high d's, etc., read on!

A Band-Aid Solution

As I said before, use of the vent keys to clear up dirty attacks works well, but only on the famous five notes on the top of the bass clef staff.

What can you do if you crack other notes on the bassoon -- especially the ones above that range that are so touchy?

Being Clever With Your Tongue

Many young students are never told how to use their tongue when starting the bassoon past "just put the tip of the tongue on the tip of the reed".

This works well for beginners, but anyone wanting to clean up dirty articulation or match articulations with string players or other winds soon begins to experiment with other ways of tonguing.

Corner Tonguing

I never thought about this until I went to study with K. David Van Hoesen in college. He learned to tongue on the corner of the reed for a subtle, clear articulation. His colleague, the oboe teacher, Robert Sprenkle showed him this. Indeed, many oboists tongue off-center or on the corner of the reed tip.

Van Hoesen's instruction was specific.  Tip your reed so that the sides point like watch minute and hour hands at 10 and 4 o'clock. That is, with the reed tip slanting slightly down to the right from horizontal. Tongue on the right corner.

Try this and see what you think.

I actually keep my reed with the sides at horizontal and tongue on the left corner, but see which is most comfortable for you.

Release, Not Attack

Articulation should ALWAYS be thought of as a release and not an attack. Cracking is often caused by attacking the reed too forcefully with the tongue from a distance away in the mouth.

It is essential to have the tongue ON the reed (corner or off to the side of the center for a touchy articulation) BEFORE starting the note. This allows you to build up proper support beforehand for a predictable start.

A vocalization of a good articulation could perhaps be spelled out this way:

Nnaahh

or

Phtaaahh

Instead of "Tah" or "Dah"

The fraction of a second needed to build up proper support is done with the tongue on the reed. Release the tongue when you want the note to start.

Think of a tennis serve or pitcher's wind up. There is a very short, precise motion involved before the ball is released.  No player simply hits or throws the ball with their hands at the point of impact. The preparation is all!  

Combining corner tonguing with this general approach to articulation should result in a  cleaner start to the notes.

Why This Works

I think this method works because, if your tongue isn't completely blocking the tip opening of the reed, some of the breath support in the prep goes into the reed already. The opening is only partially closed when the tongue touches only the corner of the reed.

The small prep of breath support going into the reed combined with an already formed embouchure may give the reed advance notice of the harmonic at which it must vibrate to excite the air column inside the bassoon so that the proper pitch is the only one present in the articulation.

A Practice

If this technique is new to you, try this:

Put your tongue lightly against one corner of the reed tip while making an embouchure. Finger a note and blow softly. Notice that some air can go into the reed.

Now practice putting your tongue on the reed corner while forming the embouchure and this time build support. Then remove the tongue from the reed.

For a predictable, subtle articulation, compress the amount of time needed to coordinate the above steps into a fraction of a second -- about the time needed for a conductor's upbeat in the tempo of the piece you're working on, for instance.

Wednesday, October 29, 2014

A New Litmus Test?

Clean articulation is something to which all bassoonists aspire. If it is possible to say that bassoon playing has continued to improve over the years in America, cleanliness of articulation is one area that has gotten a lot of attention and where improvement over the years (as witnessed by recordings, etc.) has been vast.

The Past

Through listening to older recordings it is clear that a certain dirtiness in articulating notes built on harmonics on the bassoon (notes above open F) was tolerated until recently. Even the best players cracked.

Awareness and Improvement

It is thanks to awareness raised by Norman Herzberg and his students and the influential European tradition of the use of the vent keys that we no longer tolerate cracking articulation on the bassoon.

A lot of effort has been spent instilling the use of the vent keys of the wing joint for clean articulation. However, the vent keys can only be used for five notes (A2, Bb3, B3, C3 and D3) so there's still a problem if cracking persists farther up the range.

Most bassoonists can articulate these five notes cleanly using this technique. A recent trend in audition repertoire lists may indicate that it's time to clean up articulation on other notes in the high register.

In at least two recent auditions -- our Second Bassoon audition and the Chicago Symphony Orchestra's Principal Bassoon audition  -- the following excerpt was used to separate the clean articulators and the dirty ones:


It's the second page of Bolero.

We used this excerpt in the final round of our audition. All of our finalists played at a very high level. However, NO ONE articulated the G's cleanly!

Perhaps we bassoon players have become too comfortable with the sound of a high G that cracks!

The non-bassoon players on the audition committee found it especially puzzling that even these otherwise fine players would allow such an obvious lapse in their technique.

How to correct dirty articulation on this note? One can't flick G3 on the bassoon, so other solutions must be found.

One-Note Solution

The following fingering for G3 can help clear up the attacks:

1/2 x x / x o o Ab
        w   Bb

I'd be willing to bet that if you crack G3, Ab3 and other high notes are going to crack, too. So this fingering may solve the problem for this particular pitch, but obviously it can't be used for other notes that crack.

I'll offer a solution for that works for all notes on the bassoon in the next post.

Monday, October 27, 2014

Gareth Thomas joins bassoon section

At the beginning of the month we hired Gareth Thomas as our new Second Bassoonist!


Welcome Gareth!

Currently Principal Bassoonist with the Toledo Symphony, Gareth's teachers included John Clouser and Christopher Millard. He is originally from Ottawa, Cananda.

He will play with us next month for a series of concerts and then start formally after the New Year.

It will feel good to have a complete section again after a few years of vacancies.

Saturday, April 5, 2014

Building an Interpretation -- Harmony

Harmony

Knowing the harmonic underpinning of a line can lead to a convincing interpretation. In the case of Shostakovich you might not think that's so important.

Just playing through the bassoon part to the 4th and 5th movement of the 9th Symphony, you barely notice a particular harmonic base. In fact, a lot of it sounds atonal.

However, a close look at the score reveals a very traditional harmony for both passages in the 4th movement.

In the first passage, there is an F major chord held throughout in the strings.  The lack of cellos (just violas and basses) and a first-inversion spelling gives the chord a disembodied feeling, but the harmony is still very clear.


In the passage above I've used a "c" to denote all bassoon pitches that fit in the F major chord. All dissonant notes are circled.

Interpretation:

Knowing whether or not a particular note is dissonant or not opens avenues for interpretation. The "d" half note 11 notes in is quite dissonant and long in duration.  It also makes up the first note of the half note motive outlined in my previous post.

Therefore, this should be a real point of tension in the line. I make a crescendo to the "d", give it a strong beginning and hold onto it a little longer than two beats.

Another obvious tension point is the high "Db" right after the quarter rest.  To bring this out I elongate the quarter rest (this allows the F major harmony in the strings to shine through for a brief moment), stretch and increase tension on the "F" just before the "Db" and lengthen the "Db".

Since there is no meter, varying the length of the rests in this passage can add to the dramatic effect. I like to minimize the last quarter rest (before the final "Eb"-"C") in order to show that the tension is not really gone until the consonant C is sounded at the very end. I don't agree with the practice of some who like to breathe during this rest -- it lets up on the tension before it's time to do so. Don't breathe, but hold out the "Db" before the rest longer than normal length, rest and come right in with the "Eb".

Second Passage


The second passage follows suit. A major, first inversion. Look for the dissonances and consonances in this one.  They are placed strategically throughout the line. I extend the final crescendo in order to stress the dissonance of the "Bb" towards the end.

A Simulation

The effect of playing this in the orchestra can be simulated by having three other bassoonists hold the chords while you play.  You can really hear the harmonies this way!  Trade parts and let everyone else have a turn with the solo.

Alternatively, have a pianist play the chords while you play the bassoon part.  The pianist will need to re-strike the chords several times during the playing to keep the sound of the harmony alive.

Acknowledgement

I'd like to thank Doug Spaniol, Bassoon Professor at Butler University, who introduced me to the harmonies of this movement during a master class he gave for my students at Michigan State University many years ago.

Wednesday, April 2, 2014

Building an Interpretation -- Motives

The Motives

In this post, I'll examine the motives employed in the first bassoon part for Shostakovich's 9th Symphony. An understanding of what motives are used and how they are deployed, developed, etc., lends greater clarity and authority to any interpretation.

As such, Shostakovich descends from a long line of composers best exemplified by Beethoven, who, upon settling on a particular motive were extremely skilled in capitalizing on the most salient features of the motive through repetition and development.

Let's go to the part to see what I'm talking about.


4th Movement:

In the 4th movement I identify two particular motives. The first is the two half notes that comprise the first interval of the solo -- a perfect 4th. In the highlighted section below I show where this motive is developed over the course of the movement. 
The perfect 4th half notes go through a transformation as the movement progresses, the interval decreasing to a minor third at the end of the first section. In the second section, Shostakovich takes more liberty with the interval and the rhythm, but the reference to the opening interval is clear throughout.

Interpretation:

I play the perfect 4th in imitation of two big Russian church bells, with lots of sound at the beginning of each note and a slight decay towards the end. This is an appropriate reaction to the enormous brass fanfare that introduces the solo. As the movement progresses, I try to return to the "bell" style each time the motive comes back. However, as the interval decreases in size, I let the "bell" shape deteriorate into a softer figure.
Time should be taken to allow each two-note "bell" have an impact.

This motive comprises the "bones" or "skeleton" of the movement. Now on to the "flesh".
The highlighted portions in this excerpt show the connective tissue that binds the "bell" motives to each other. These motives are chromatic and step-wise in nature. Very different from the perfect 4th "bell"!

As such they represent a sort of reaction to the announcement of each "bell".

Interpretation:

Each chromatic line needs to lead to the next two-note "bell". Generally I crescendo through to the end of each group to help introduce the "bell". Rubato helps keep the line interesting and helps to avoid a static feeling to the lines.

At the end the chromatic line degrades to a simple pair of minor 2nds without any "bell". Set in the middle register, this last line, following the primal scream of the high register lines above, is like a wounded animal writhing on the ground.


5th Movement:

I identify two motives in the 5th movement. This movement is a March. The first figure imitates drum rudiments.

Imagine a regiment marching to the front to the beat of a drum. The sixteenths punctuate the steady trhythm of the eighths.

Interpretation:

Play the sixteenths slightly louder than the eighths and make them lead to the next eighth. Have the sound of a snare or side drum in your head and you'll get the style just right.

The second motive is the group of steady eighth notes.
Interpretation:

These are the men marching. Make the staccato consistent and dry throughout. Be careful not to creep into the "mf" range. The movement starts a bit slow for a march (♩=100), adds forces and increases tempo later on. No need to do this yourself.

There is occasionally a conductor who likes the bassoonist to accelerate to the end of this solo. Resist this if you can! Shostakovich writes no such indication and adds tempo changes later in the movement.

In my next post, I'll show how the harmonies of the 4th movement can help craft a solid interpretation of this piece.

Wednesday, March 26, 2014

Building an Interpretation -- The Score

The Score

Using the example of the bassoon solos in Shostakovich Symphony #9, I'll explore different ways of building a solid interpretation.

Ways I'll outline for the Shostakovich include:
  • Use of the orchestral score as starting point
  • A motivic analysis of the bassoon part
  • Harmonic analysis
  • Examination of the musical context of the bassoon part and a look at models from other works by Shostakovich 
  • Historical influences and anecdotal information   

What the score shows

The fourth movement begins with an ominous brass fanfare.

 Take a look at the score:


At the end, the tam tam strikes and the violas and basses enter unobtrusively.  As the brass cut out the strings sustain into the bassoon solo. The orchestration is notable for the absence of violins and cellos.  Scoring without violins gives the voice of the bassoon more acoustic space. The lack of cellos gives the string bed a more transparent, even disembodied feel (especially with a lack of the root of the chord in the basses).

At the bassoon entrance, the meter disappears as do the bar lines. The key signature becomes irrelevant. We are clearly not operating in bminor at this point. The tempo indication changes from ♩ = 84 to ♪ = 84, so twice as slow as the fanfare that starts the movement. 


Nonetheless, the bassoonist now has a great deal of freedom for interpretation. So what to do with all that freedom?!

The lack of bar line or meter should remind us of opera recitative or the sound of someone speaking some lines. Thus, there should be in the interpretation the sense of a dramatic recitation; a flow to the lines that mimics speech patterns with inflections and emphases. 


Towards the end of the movement, the meter returns and in the fifth movement, a strict 2/4 meter is established, along with a faster tempo.


In my next post, I'll examine the motives used in the solos and how, in the 4th movement, highlighting them can add to this sense of dramatic recitation, whereas the motives in the 5th movement bring a strict, march-like character to the piece.

Starting with the score is always a good idea, but in the case of this piece, especially so! The bassoon part lacks some information printed in the score and the great freedom accorded the bassoonist may lead to confusion or lack of conviction in the interpretation.

Please also note that metronome markings in the score are not printed in the bassoon part. Also, some excerpt books have discrepancies with the score and the bassoon part.


Monday, March 17, 2014

Building an Interpretation -- I'm back!

I'm Back!

Due to an extremely busy schedule, I've had to suspend activity on this blog for a few months.

Here's what my past couple months looked like:

1. Increased load in Cleveland Orchestra due to second bassoon vacancy. Played 2nd bassoon and some first bassoon on a Brahms DVD in January.

2. Five weeks on the road TCO.

3. Full recitals at CIM and LSU this month.

4. Half marathon and a couple of 5k races.

5. Master classes at University of Nebraska and LSU.

6. Orchestra Committee work

So something had to give. . .

Anyway, things have calmed down a bit and I'm ready to blog with some new topics that I hope will be interesting and thought-provoking.


Building an Interpretation

I'd like to start a thread here on how to build an interpretation. Let's start with some ground rules:

1. Some music doesn't require a full-blown interpretation. It is enough to play what's on the page and leave it at that.  Examples:
  • Some modern music -- especially pieces in which the composer has prescribed tempo, dynamics, etc. in minute detail. 
  • Orchestral excerpts such as Overture to Marriage of Figaro, Ravel Piano Concerto (3rd mvt) and Beethoven 4th Symphony (last mvt).
2. However, most music requires at least some personal input from the performer. This is where some bassoonists fail.  The bassoon presents so many difficult technical challenges that it's easy to become focused solely upon technical perfection and mastery of control of the instrument. Interpretation is by its very nature subjective and open to nuance and ambiguity. So it takes initiative and inspiration to build an interpretation.

3. Yes, mastery of the instrument is extremely important, but it's just the prerequisite for artistry. Artistry requires interpretation.

4. For me there isn't a "correct" interpretation for every piece of music. Nor are interpretations other than mine "incorrect".

5. There are only convincing or unconvincing interpretations.

6. It's better to have an argument than to have nothing to talk about! Too often a musical performance provokes a pleasantly innocuous response from the audience.

It's enlightening to read contemporary reports about performances in the Baroque and Classical periods. Audiences came to concerts expecting novelty and freshness. They expected to be moved to tears or to feel joy or solemnity based upon the effect of a performance on their emotions. At times there were arguments in the theater during the performance.

Many student performers have an especially hard time coming up with a convincing interpretation. While it is they who should -- through their youth and enthusiasm -- be best at novelty and freshness, too often it is an overriding desire to please or the result of much spoon feeding in their education that results in interpretations that are not convincing or are half-baked.

Shostakovich Symphony #9

In the next few posts I will use the great bassoon solos in movements 4 and 5 of Shostakovich's 9th Symphony as a vehicle for how to build an interpretation.

I will explore my own thought process in building an interpretation of this long excerpt. However, I hope through exposure to the methods I employ you will build your own convincing interpretation of this music and not just mimic what I've done!